If there’s one thing I love about creating art, it’s the way an unfinished sketch can call me back to it, even if it's much later. The sketch doesn’t need to be polished or perfect—far from it. Like a tiny seed buried in dirt, it holds endless potential to bloom. This time, it came in the form of a little Valentine's Day sketch nestled in the pages of my oversized sketchbook.
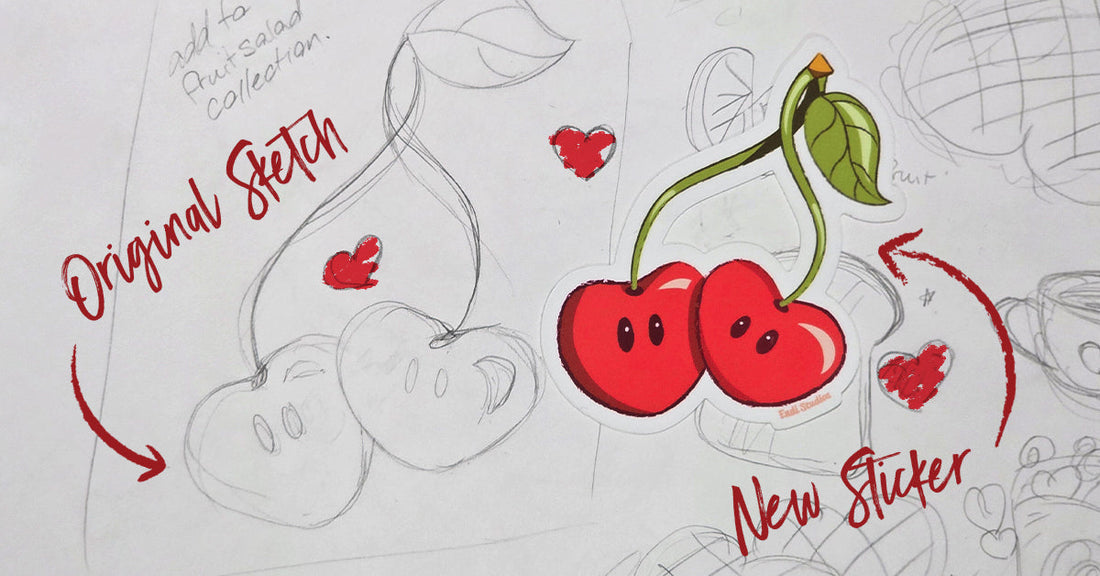
Frankly, it wasn’t much to look at—just a rough doodle of cherries, the kind that's just enough to get the idea down and move on. That’s the charm of sketchbooks, though, isn’t it? They’re not for masterpieces; they’re for beginnings.
This particular sketch had been lingering for over a year and a half, patiently waiting for its glow-up. Every time I flipped past it, I’d think, “One day.” Well, that “one day” finally arrived.
Brewing the Idea
Before anything could happen, I took a quick photo. I grabbed my phone, snapped a picture of the cherries and brought it into Adobe Illustrator. But before the real magic could start, I needed to decide on my palette.
Creating a color palette is one of my favorite parts. It’s like assembling ingredients for a recipe. Each tone, each highlight and shadow, works together to tell the story of the piece. For the cherries, I drew some color inspiration from some royalty-free photos, pulling out bright, juicy reds and contrasting them with cheerful greens for the stems—vibrant, playful, and full of personality, just like the design I imagined.
A Cheeky Shortcut for a Unique Detail
Every good collection has its little quirks, and these cherries will be added to my Fruit Salad Collection. If you’ve seen my other fruit designs, you probably already know about the signature feature they all share—those cute, slightly mischievous eyes. They add such a fun, whimsical touch, don’t they?
Here’s a little behind-the-scenes confession: Those eyes? They’re the same for every fruit in the collection. And why not? It’s my way of connecting them, giving them a little “family resemblance.” A quick copy-paste from one of my earlier designs, and voilà—those cherries suddenly had personality.
From Flat Sketch to Lively Character
What followed was my favorite part—transforming the raw idea into something dynamic. Using Illustrator’s pen tool, I traced the cherries’ outline, refining shapes and edges to give them life. It’s a delicate dance between keeping the charm of the original sketch and polishing it enough to feel complete.
Details like varying line widths added dimension, while shadowing and highlights gave the cherries a glossy, ripened look. Little by little, it transformed from a flat doodle into a vibrant design that felt like it could bounce right off the screen.
The Sticker Reveal
Once finished, it was time to turn my digital creation into something tangible. Seeing my art come to life is always a thrill, but stickers hold a special place in my heart. Maybe it’s because they’re small but mighty, capable of spreading a little burst of joy wherever they land—on a laptop, a notebook, or even a water bottle.
A week after finishing the design, a package of 3.5" vinyl stickers arrived, and I couldn’t wait to see how they turned out. Pulling the first sticker from the pile honestly felt like unwrapping a gift. There they were—my cherries, bold and lively staring back at me.
I couldn’t help but smile. It was the kind of small, satisfying moment that makes days spent hunched over a desk completely worth it.
Share the Joy!
Now that these cherries have made the leap from my sketchbook to the real world, they’re ready to find their way into the hands of fellow creatives, sticker enthusiasts, and anyone who needs a pop of color in their day.
Interested in snagging one for yourself? You’ll find them in my shop, ready to ship out and bring a little joy into your life. This sticker is more than just a fun design to me; it’s proof of what can happen when you give a forgotten sketch a second glance.
Here’s to finding beauty in the small, overlooked corners of life—and to turning them into something extraordinary.
See you in the studio!
Heidi
PS. Click here if you would like to watch the making of this sticker